The Backend Servers section of the portal is where VPN connections are created. Each VPN connection will allow a single computer to connect to the HomeLab Host infrastructure. We recommend creating one VPN tunnel for every server at home that will be hosting something.
Every HomeLab Host account must have at least one VPN connection configured, otherwise there would be nothing to connect us to your homelab.
For a broad overview of how the infrastructure works, check out our Getting Started Guide.
¶ Creating Your First VPN Connection
The first time you navigate to the Backend Servers section, you won't see much. This is how the portal section will look initially.

Click the green Configure a New VPN Connection button to start setting up your first connection.

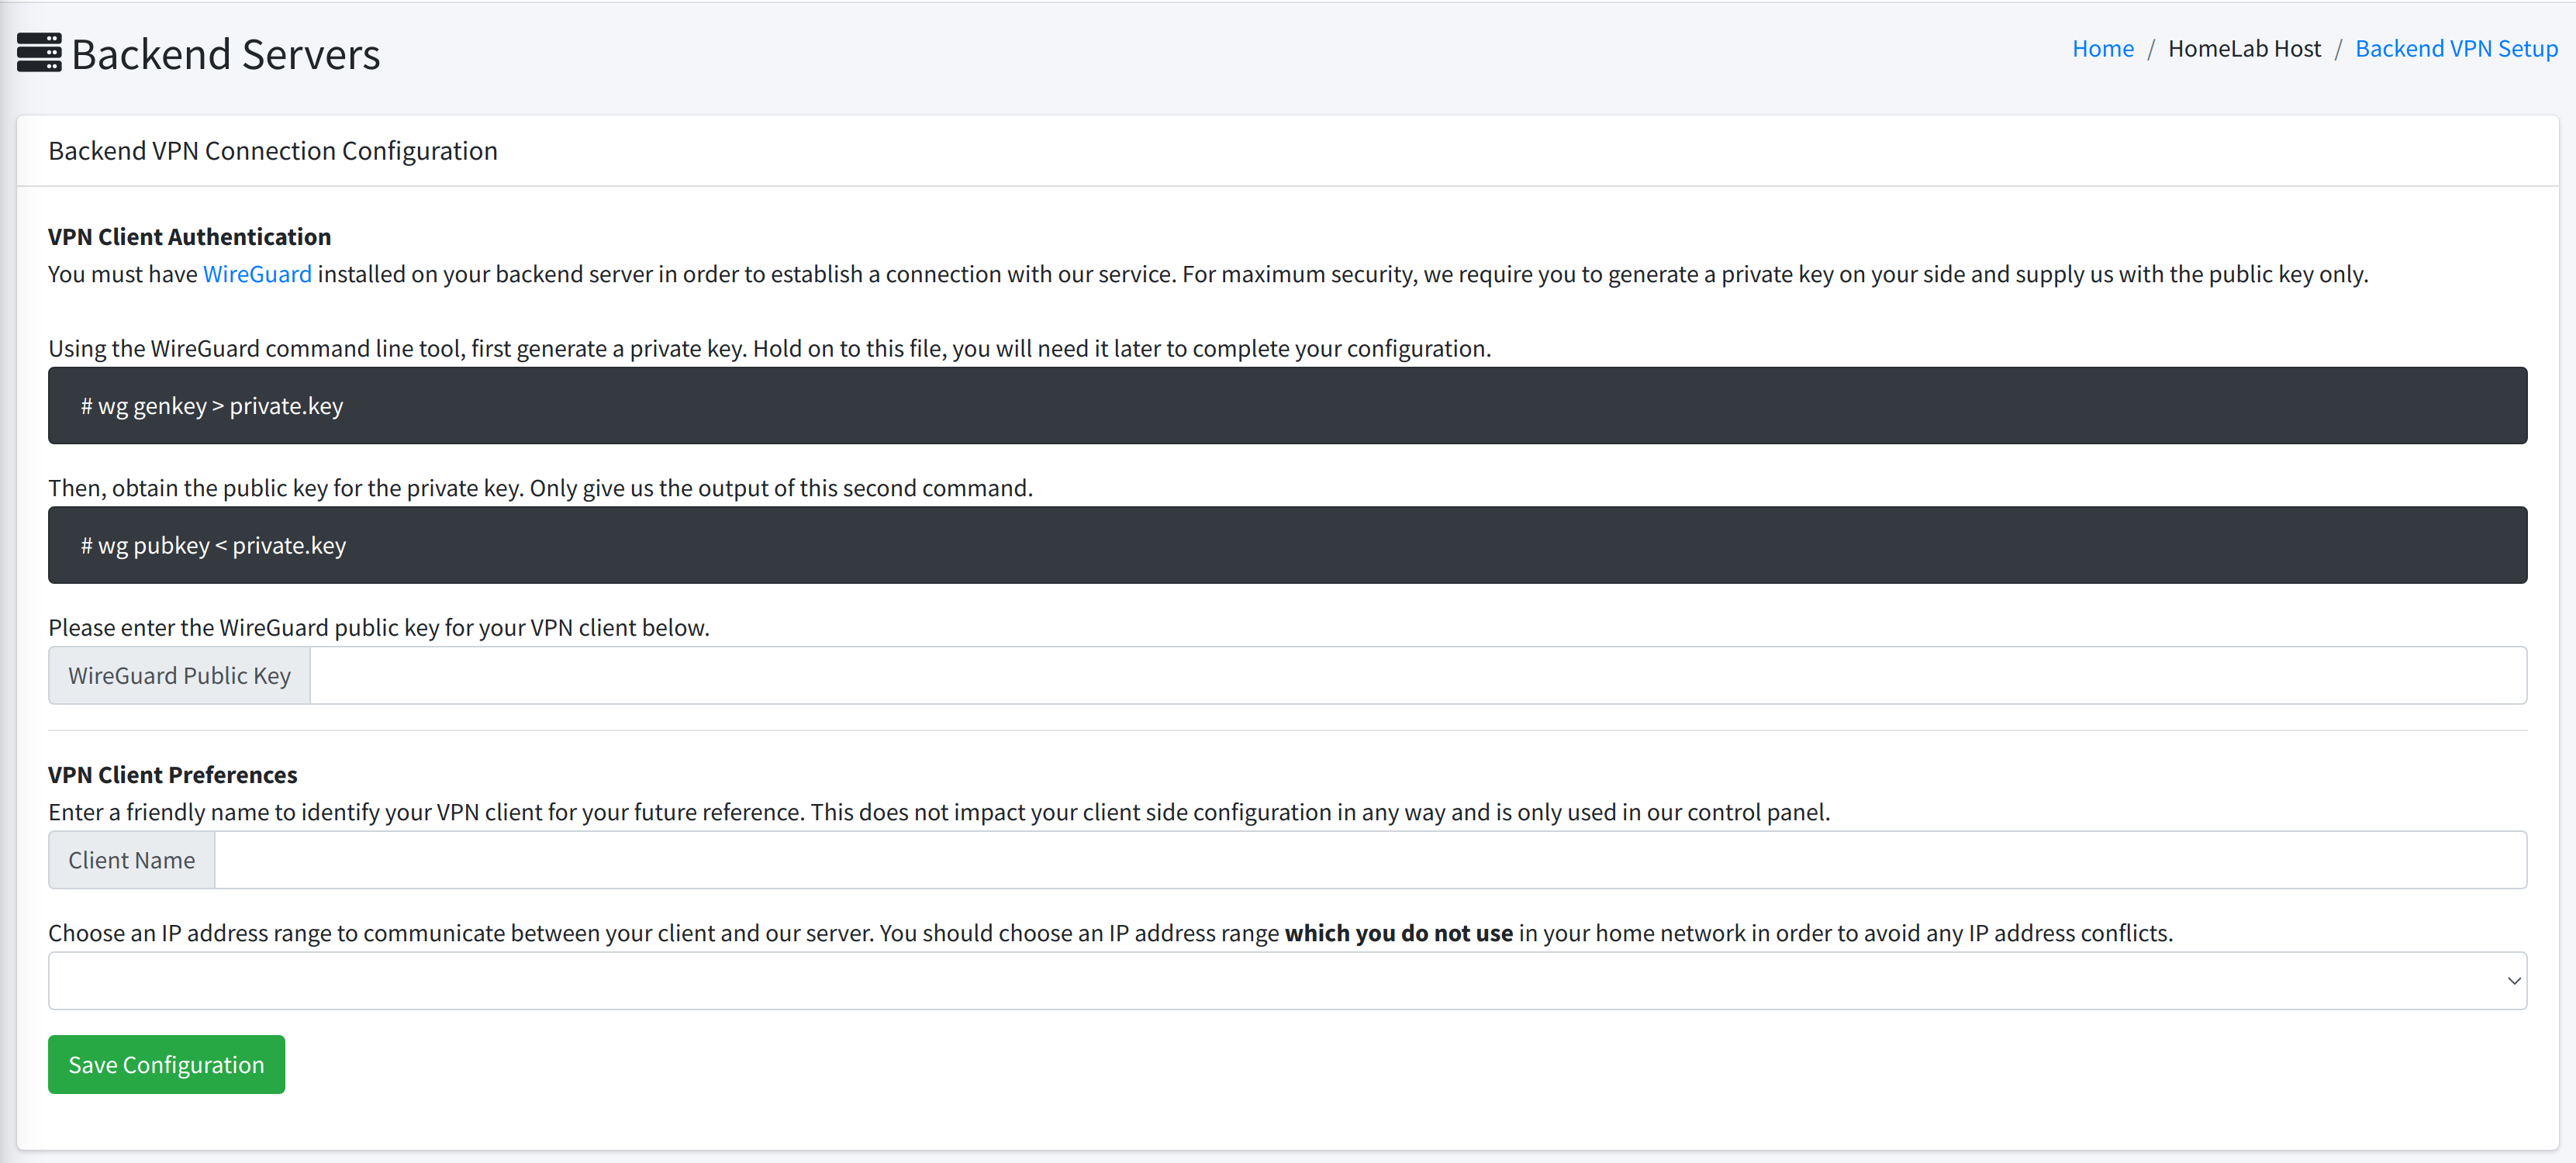
You will be brought to this screen:

There are only three boxes to be filled out here:
¶ WireGuard Public Key
This field will be filled out with a public WireGuard key. On the page itself, we provide you with a quick reference for how to create a key pair. This works on every operating system from the command line.
First, generate a private key for your VPN client.
wg genkey > private.key
Do not share the private.key file with anyone. This is not the key we are asking you to provide us.
This command will create a file called "private.key" in the current working directory of your terminal. Do not send us the contents of this file. This file should not leave your computer.
WireGuard may print a warning about a world accesible file and umask. This is a recommendation by WireGuard to secure the file permissions on your private key to prevent other users on your computer from being able to read the file, it will not impact the successful creation of a key. If you want to abide by the warning and secure your key file so other users can't read it, you can simply: # chmod 700 private.key.
To show you what this looks like, here is a screenshot of us generating the file and then using cat to view the contents.
(Don't worry, this private key was deleted immediately after this and isn't going to be used for anything but demonstration purposes. You should NEVER share your private key, or you have compromised the security of your VPN connection.)

Next, we will obtain the public key for the private key. The output from this command is what you should enter on our website.
wg pubkey < private.key
The output from this command is what we are asking for, copy and paste this output to us.
For demonstration purposes, here is a screenshot of this output:

So in this example, we would write Rbs6VBPIs2L7h+Bnvl5O4I/Z2LtWT43POl+9DCyHzho= in the box on the form. You should copy\paste the output of your wg pubkey command into the box accordingly.
¶ Client Name
This field sets a name for your VPN client. The name can be anything you want, but it will be used in other areas of the portal to reference the server when setting up connections to it like websites and port forwards.
We recommend setting a friendly name for the server that you will remember, or even just using the hostname of the server.
In this example, I will type My Demo Server into the box.
¶ IP Address Range
This field is a drop-down menu which will offer you several different IP address subnet ranges for your VPN connection.
We have avoided commonly used home IP ranges, like 192.168.1.0/24. But, many of our users are enthusiasts who may choose to use less common IP ranges like 10.0.0.0/8 or 172.16.0.0/12, so we offer many options.
You can use any IP address range that you do not use on your home network. Colliding with your home network might cause the Internet or other network resources on your LAN to be unreachable on your VPN client computer when the VPN is connected. So, avoid this by choosing a subnet you don't use.
The VPN will be configured with an arbitrary IP address from the range as your IP on the WireGuard interface on your side. The gateway (on HomeLab Host's side) is always the logical gateway for the IP range (ending in ".1"). Only the client IP and the gateway IP will be routed through the tunnel.
If you are on an Internet provider that uses Carrier-Grade NAT, avoiding the subnets we offer that start with "100." may be advised, so you do not collide with any CG-NAT IPs used by your Internet service provider. For the rest of us, feel to use this unique IP range, it should cause no issues.
In this example, I will choose 192.168.73.0/24.
¶ Completed Example
Here is a screenshot of the completed VPN client setup from this example.

Once you are satisfied with your configuration, click the green Save Configuration button to move forward.

¶ WireGuard Client Configuration File
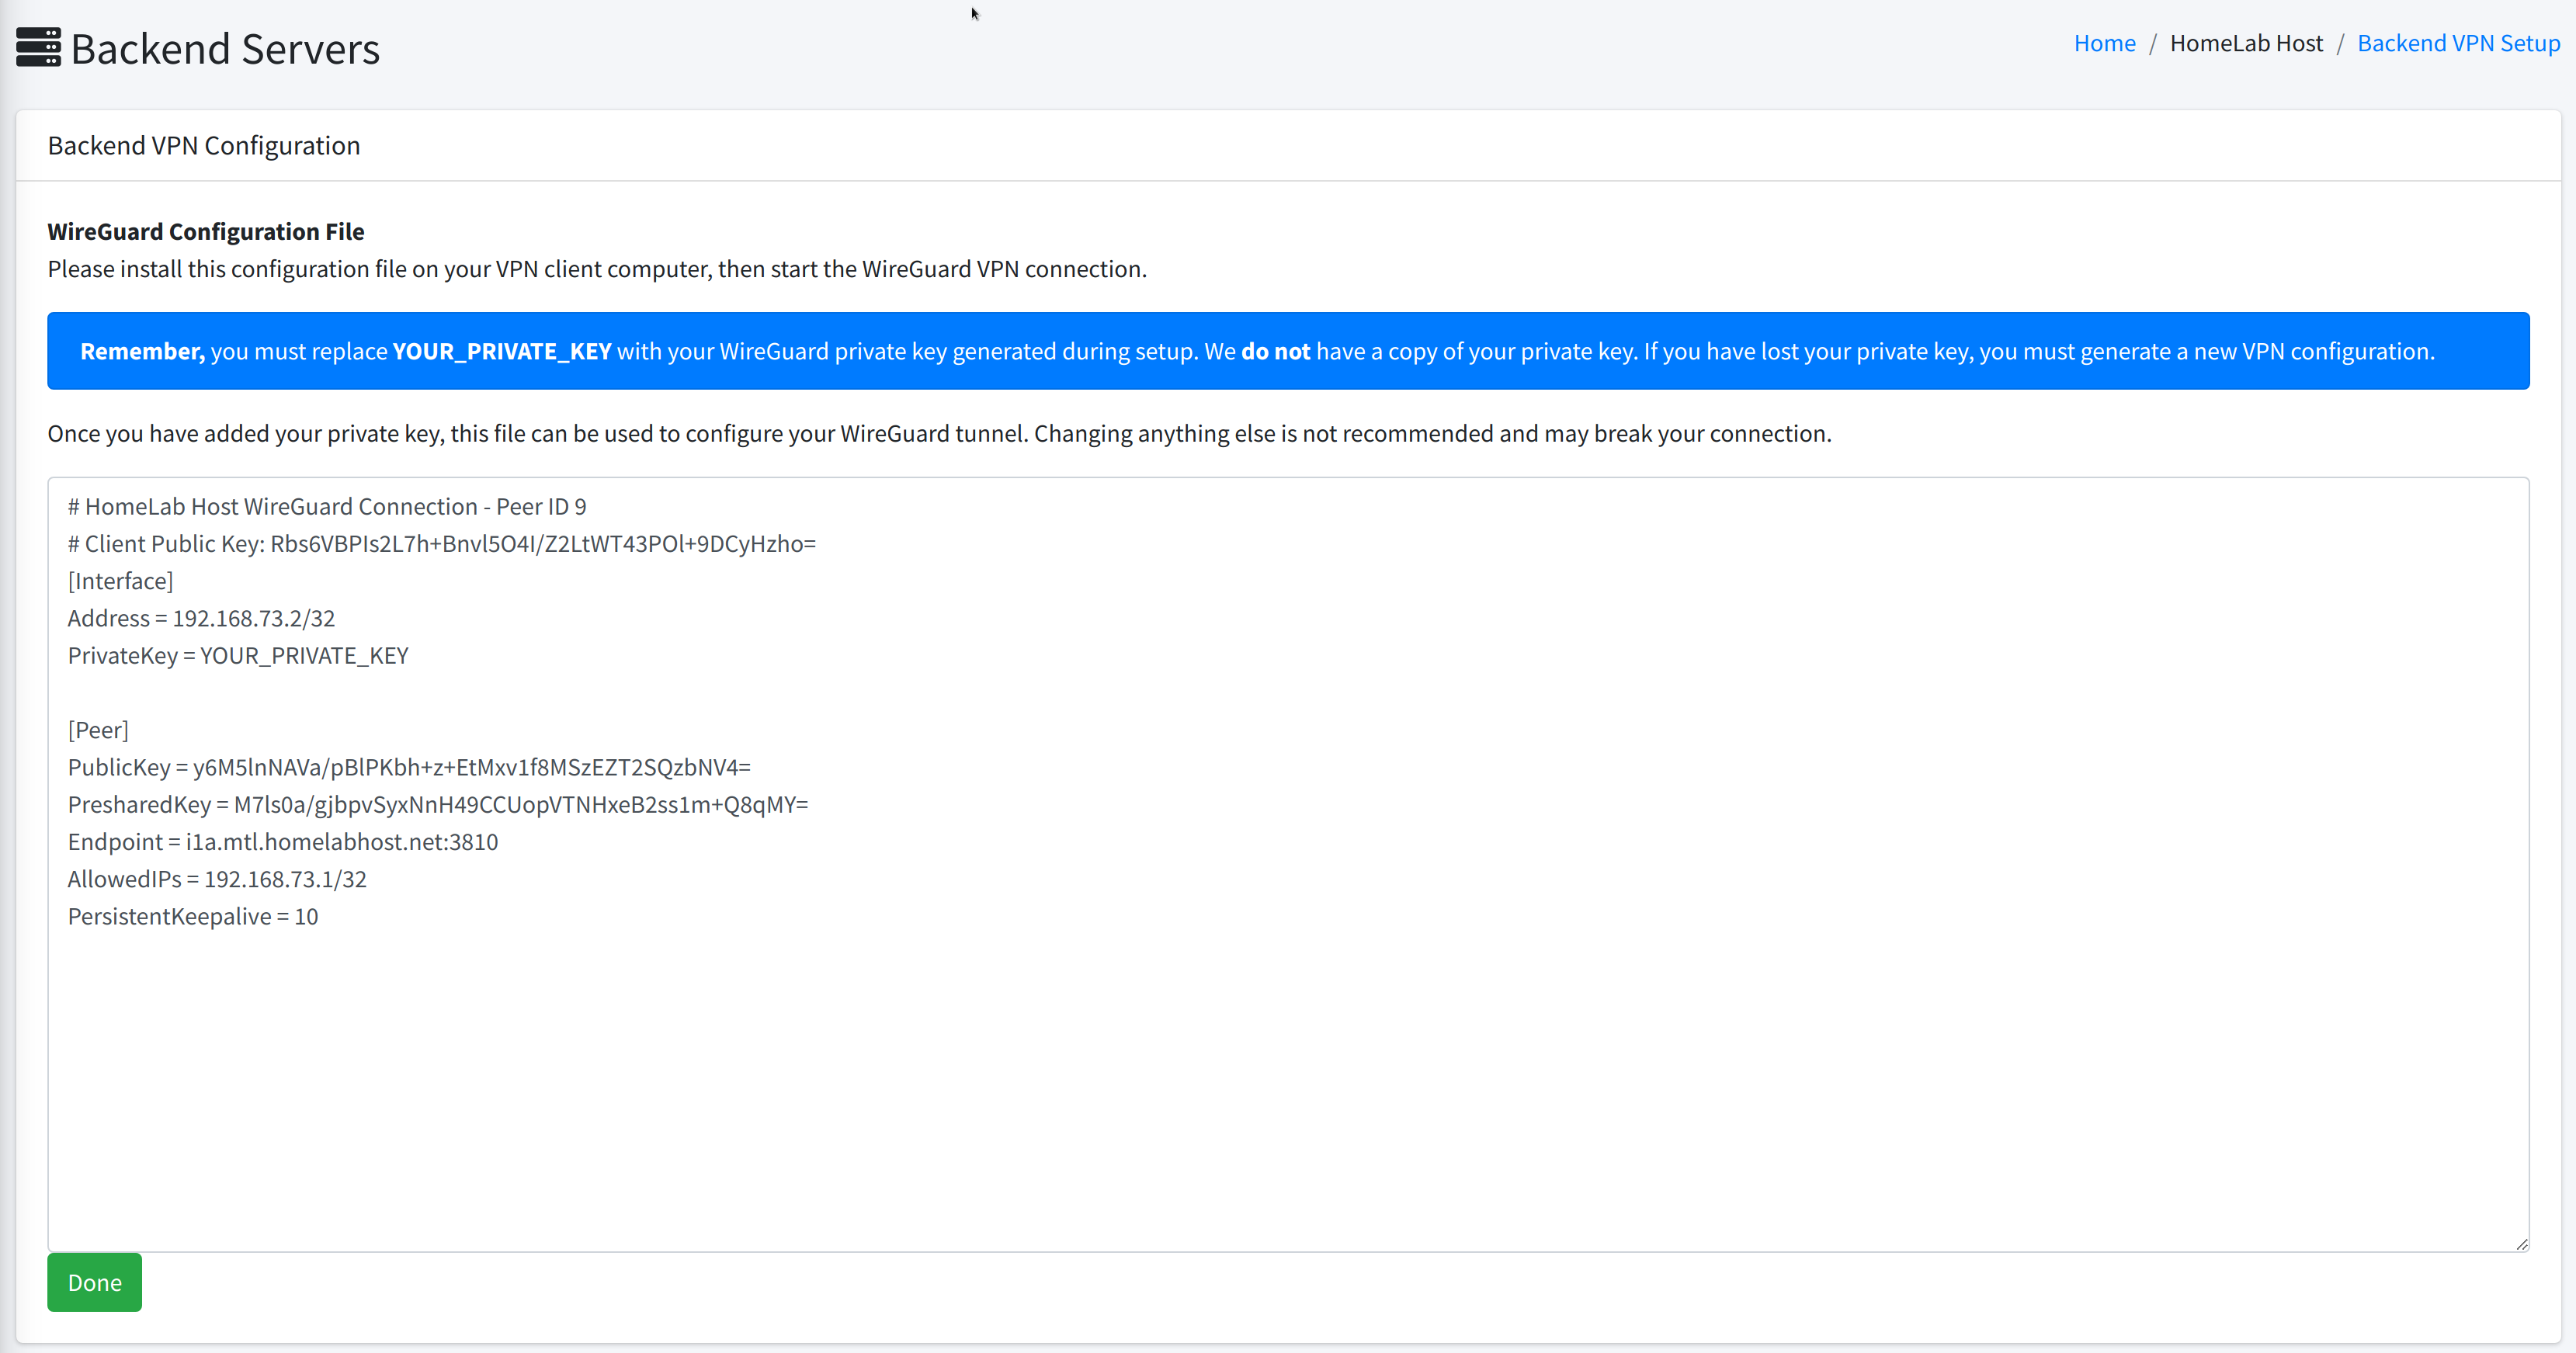
Next, you will move forward to a page which will provide you with your client configuration template for WireGuard.
Here is a screenshot to illustrate what this looks like:

The provided configuration is complete, but since we do not have your private key, you will need to replace the text "YOUR_PRIVATE_KEY" with the contents of your private.key file, generated in the first step.
You should not share the PresharedKey with anyone. This information should be known only by you and by us. The PresharedKey enhances the security of your WireGuard tunnel.
All you will need to do now is replace "YOUR_PRIVATE_KEY" with your private key file, and save the provided WireGuard configuration in your client.
¶ WireGuard VPN Client Setup
Installing WireGuard on your home server is outside the scope of this guide. The detailed instructions on WireGuard's website are the best resource for the most up-to-date instructions and downloads for installing WireGuard on any given platform.
¶ Linux Clients
On a typical Linux installation, you can simply place the provided configuration file in /etc/wireguard, if you have no other interfaces on the system you would want to use the filename /etc/wireguard/wg0.conf.
Once your VPN configuration is in place, start the VPN client:
systemctl start wg-quick@wg0.service
To auto-start the VPN client at system boot:
systemctl enable wg-quick@wg0.service
¶ Windows Clients
¶ Troubleshooting
If you are experiencing any issues with connectivity, HomeLab Host offers a suite of troubleshooting and diagnostic self-service tools to test each of your VPN connections. Please review our Backend Server Troubleshooting Guide for a detailed breakdown of these tools and how to use them.