The Websites & Domains section of the portal will be locked until your first VPN client is created. Without a VPN client, there is nowhere to point your website.
Click here for guidance on adding your first VPN connection.
The Websites & Domains section of the portal is where websites and domains can be added to our reverse proxy servers.
When adding a website, you will configure which Backend Server (which VPN client) is hosting the website, as well as additional details like port mappings.
All websites on our infrastucture will be listening publicly on ports 80 and 443, but you can map each website to any arbitrary port on your server at home.
For a broad overview of how the infrastructure works, check out our Getting Started Guide.
¶ Creating a Website\Domain Configuration
To get started with adding a website, navigate to the "Websites & Domains" section of the client portal.

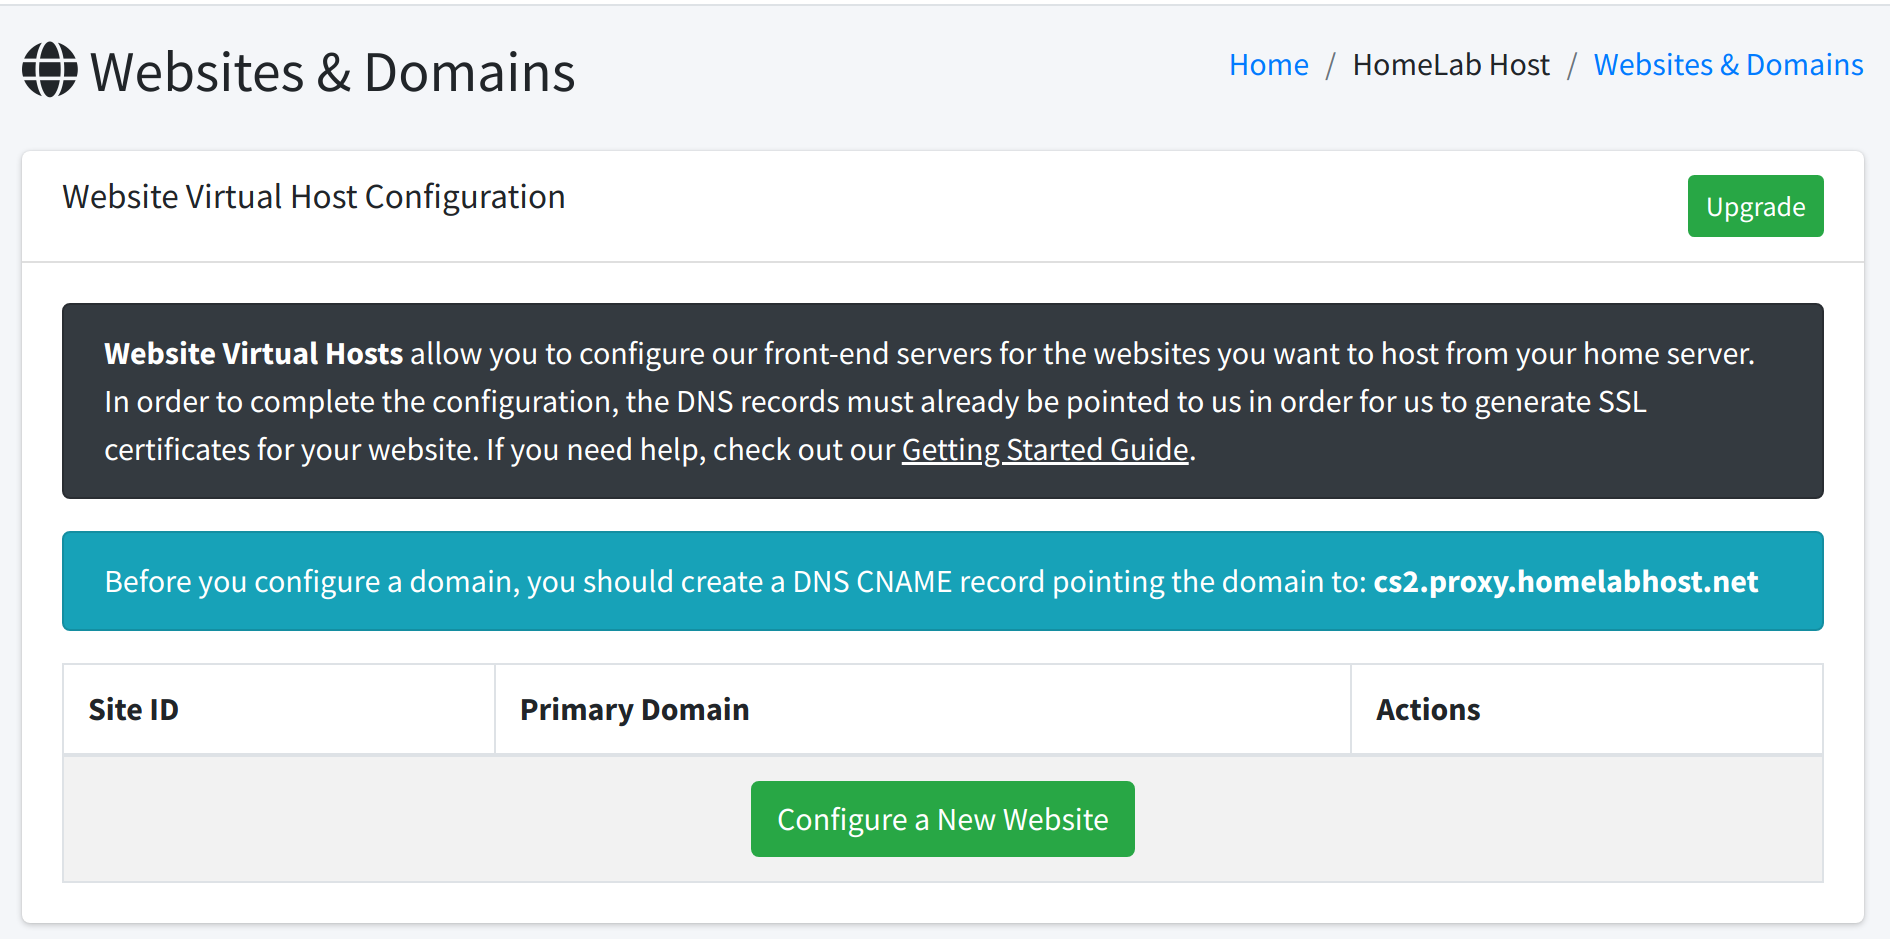
Initially, when there are no websites configured, the interface will look like this:

¶ DNS Configuration
Take note of the DNS record assigned to you (in the teal colored info box), in this screenshot above, it is cs2.proxy.homelabhost.net. Yours will be different. These DNS records are customer specific.
Any domain you want to host on HomeLab Host should be pointed to this DNS CNAME.
The DNS must be changed ahead of time, before you will be able to add the domain. This is necessary so we can generate your SSL certificate while the domain is being configured, since we use domain validated SSL certificates.
Let's say for example that you want to host example.com and its www subdomain on HomeLab Host, you would need to create the following records at your DNS provider:
example.com. IN CNAME cs2.proxy.homelabhost.net.
www.example.com. IN CNAME cs2.proxy.homelabhost.net.
Any other exisitng A, AAAA, or CNAME records for example.com and www.example.com should be removed.
Please note, you should create a CNAME record only.
Do not be tempted to resolve the DNS and create an A record pointing to the IP address. There may be some situations where HomeLab Host could change the frontend proxy IP address without warning.
Using our CNAME record allows us to perform any needed changes without any impact or intervention from you. We expect that you are using the provided CNAME and not an IP address, and any other configuration is not supported.
¶ Configuring the Website
Once you have pointed your DNS, we can add the website to the portal. Start by clicking the green "Configure a New Website" button:

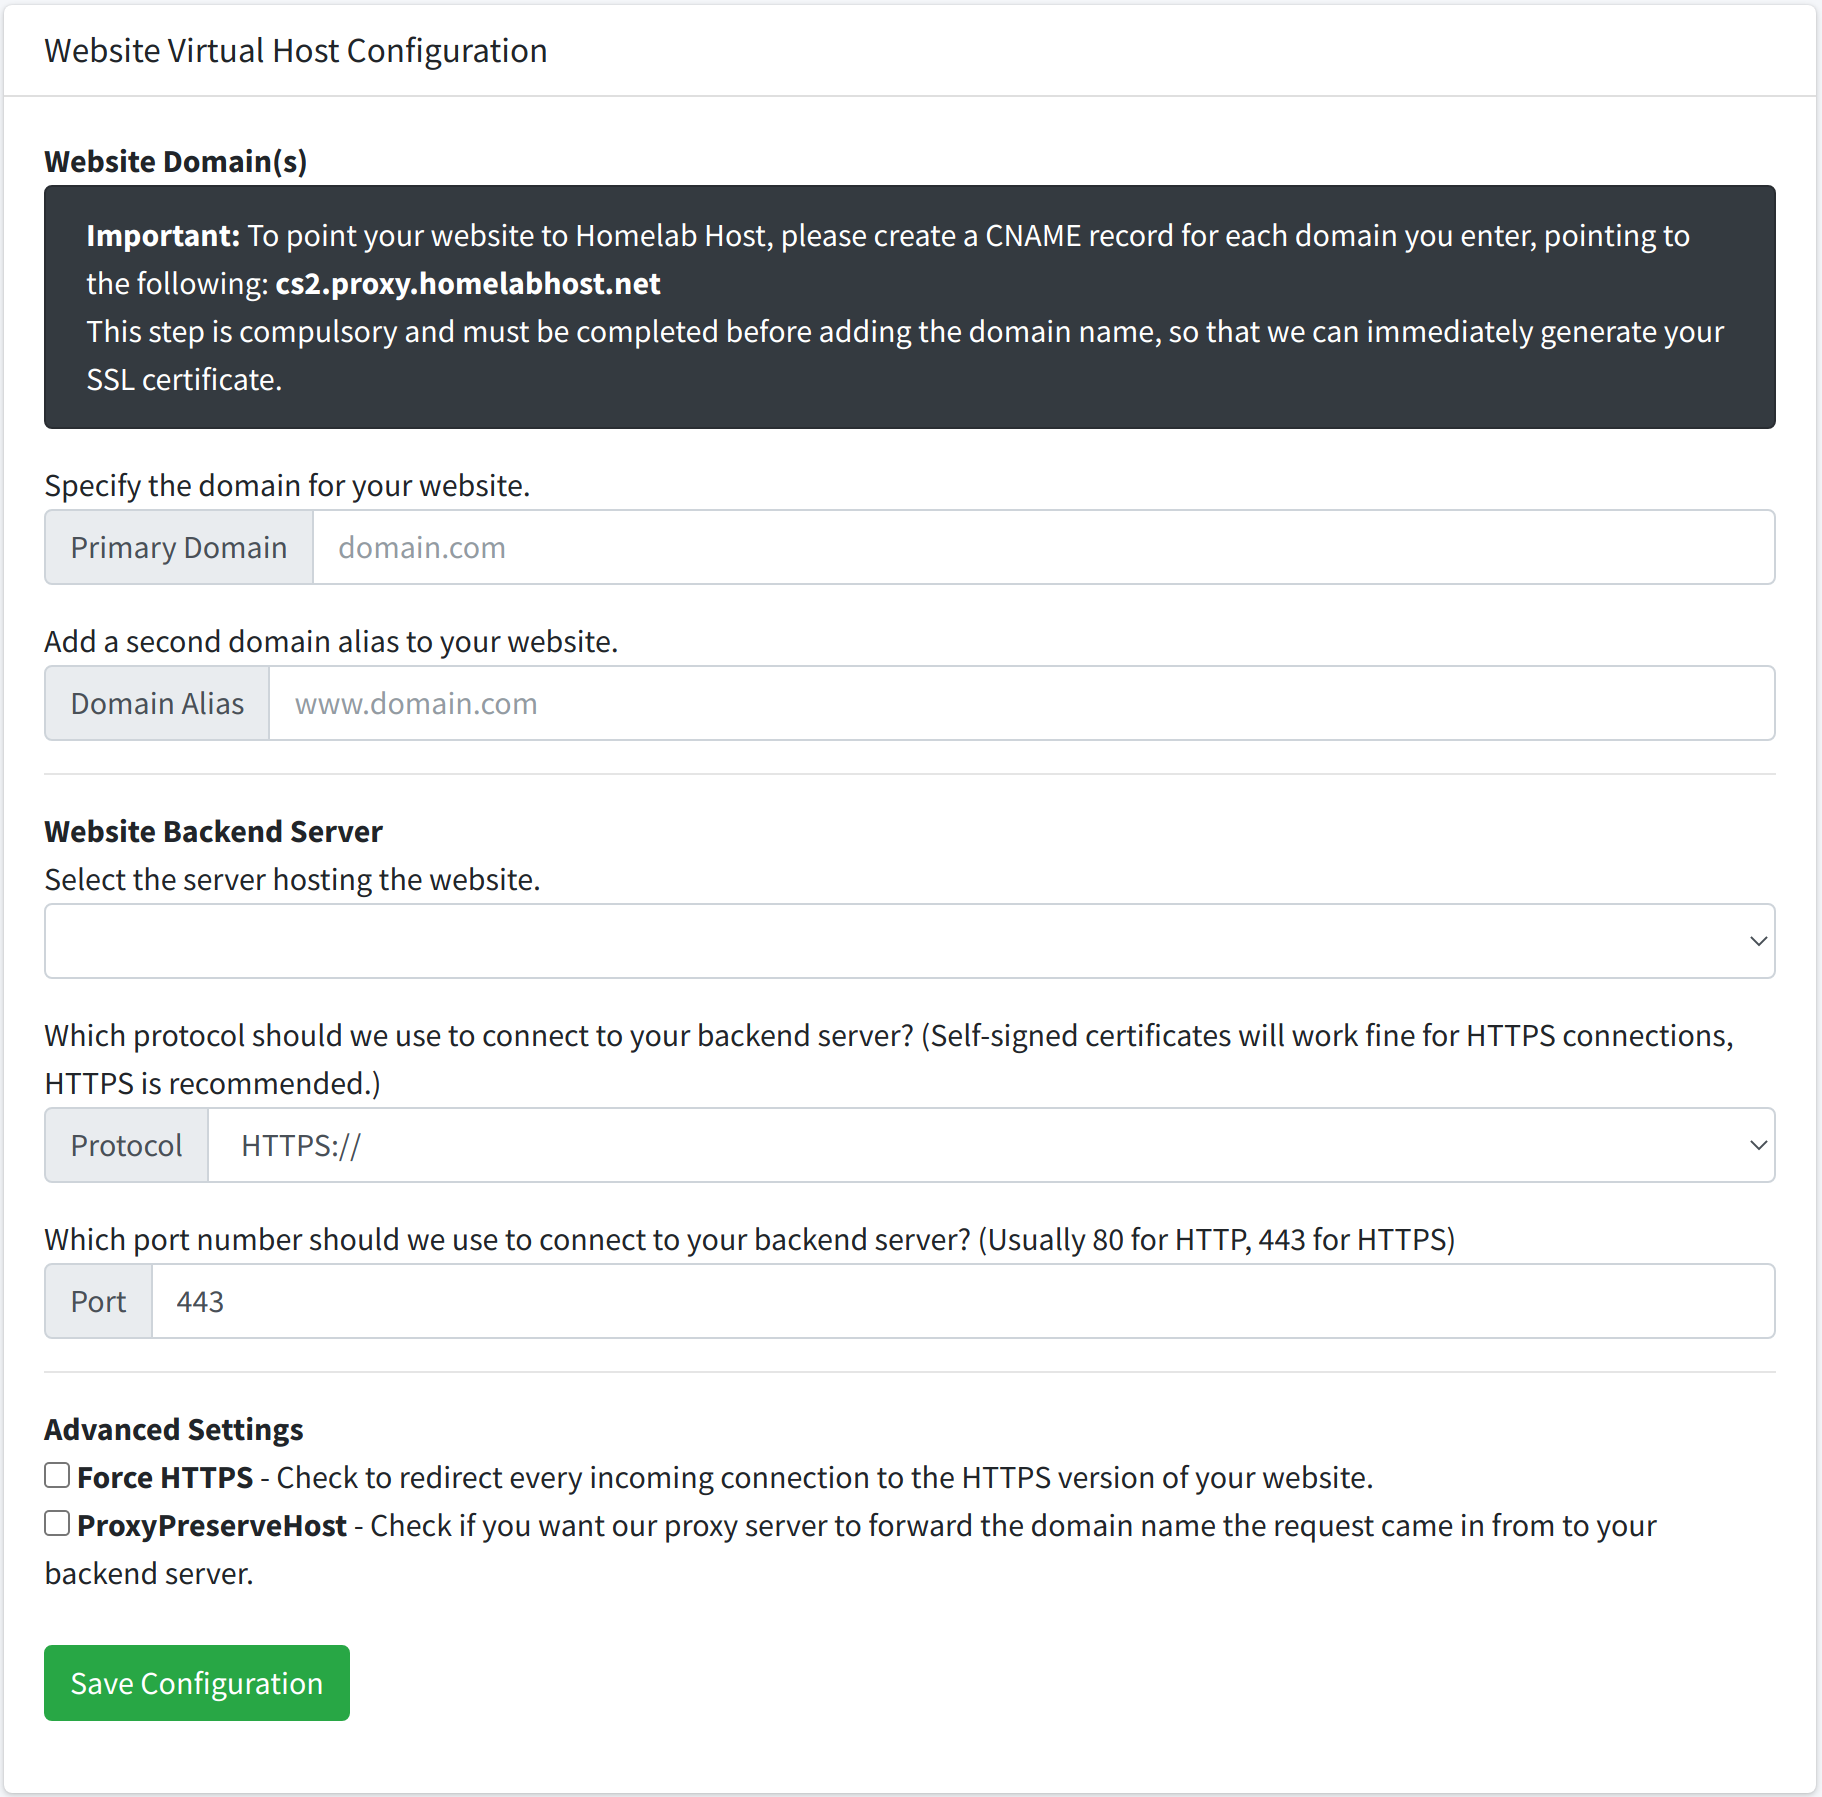
You will be brought to a form that looks like this:

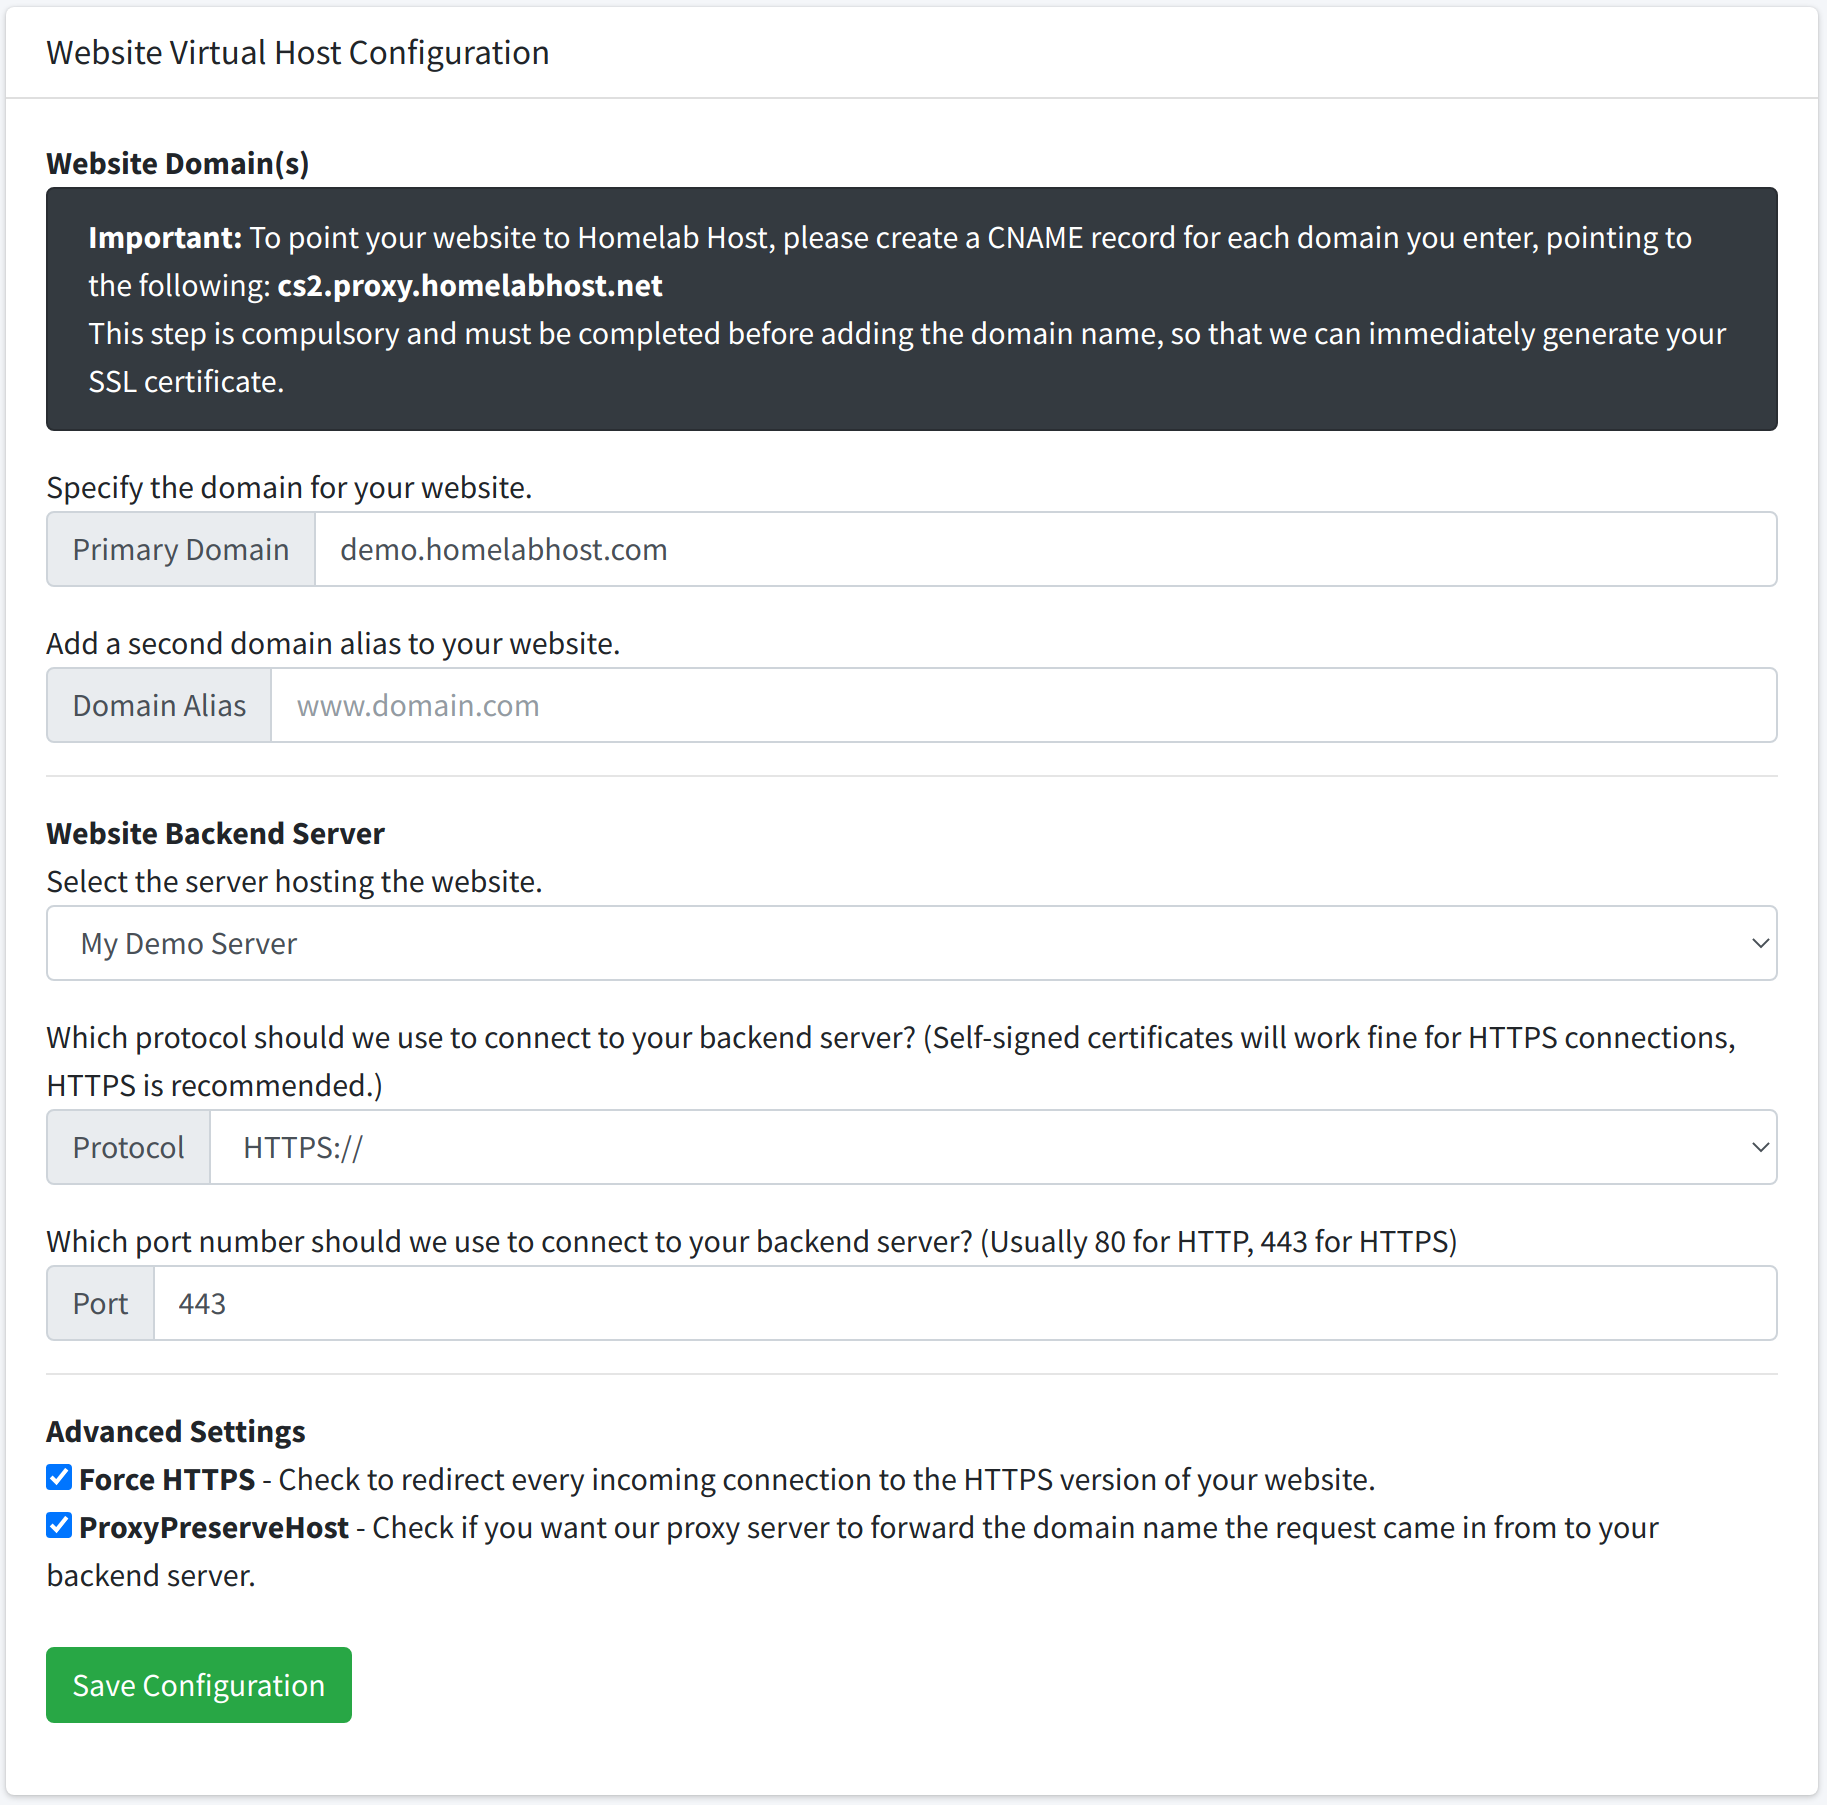
In this example, we will configure the domain demo.homelabhost.com. You should configure your own domain or subdomain that you want to host, like yourname.com. (You will not be able to get your own *.homelabhost.com subdomain).
¶ Explanation of Each Field
The form is quite simple and only a few things will need to be filled out to configure your website.
¶ Primary Domain (required)
This should be the base domain for the website.
For our "example.com" example, you would enter example.com in this box.
Four our "demo.homelabhost.com" example, we would enter demo.homelabhost.com in this box.
¶ Domain Alias (optional)
If you want a second subdomain for this configuration, like a www subdomain, put it here.
For our "example.com" example, you would enter www.example.com in this box.
For our "demo.homelabhost.com" example, we don't need a second subdomain (we don't care about www.demo.homelabhost.com), so we can leave it blank.
¶ Website Backend Server (required)
This field is a drop-down menu providing you with a list of your servers (VPN clients) you configured in the Backend Servers section.
Select the server from the list which is hosting the website.
In our example, we will choose the "My Demo Server" server we added in our Backend Server setup guide.
¶ Protocol (required)
Choose the protocol which should be used to connect to your backend server. For example, select HTTPS if the backend server is using SSL, or HTTP if it is not.
Either way, your front-end website will be secured with an SSL certificate, this setting is only used when communicating with your backend server.
Keep in mind, all of the traffic is already encrypted by your WireGuard tunnel, so either choice is okay.
HomeLab Host's proxy will not validate the SSL certificate for the backend connection, so you can use a self-signed certificate and it will not appear self-signed to your visitors.
¶ Port (required)
Enter the port number that your service is listening on at your home server. Common choices would be 443 for HTTPS or 80 for HTTP.
If you are running something on a non-standard port, like 8080, 9443, 8443, etc, you can simply enter that port here.
All of your website visitors will still connect using standard ports, even if your application is not using standard ports. These ports are only used for the connection between our proxy and you.
¶ Force HTTPS (optional)
If checked, the proxy server will automatically redirect any incoming HTTP requests to the HTTPS version of your website.
You can enable this even if your backend protocol is set to HTTP. Our proxy will still be able to serve your site as HTTPS and encrypt the connection between the proxy and your visitors.
¶ ProxyPreserveHost (optional)
If enabled, the proxy server will pass the domain name for the request along with the request. This can be useful if your backend server has multiple virtual hosts set up.
If you are having trouble with your site serving up something unexpected, like another domain that is configured on your server or a "default web page" instead of your website, this setting could be what you need.
If you aren't sure if you need this setting, you should probably enable it. Typically, even when passing a request to a self contained application that isn't designed for multiple domain support, this setting usually will not break anything and can be enabled even if it is not needed.
¶ All done?

Once you've finished filling out the form, you can simply click the green Save Configuration button to move on:

¶ Troubleshooting
If you are experiencing any issues with connectivity, HomeLab Host offers a suite of troubleshooting and diagnostic self-service tools to test each of your VPN connections.
If you are having a problem with your new website configuration, like you are getting a "default web page" instead of your expected website, check out our Website & Domain Troubleshooting Guide for tools allowing you to view web server logs, regenerate the proxy configuration for your webiste, and more.
If you are having a problem that you think may be connectivity related, such as a Bad Gateway timeout error occurring on your website, please review our Backend Server Troubleshooting Guide for detailed diagnostic tools to test your VPN connection.